Preparing to print
IMPORTANT! Always wear protective clothing, glasses, gloves and face mask when working with SLS powder.
-
From the main menu choose UNLOCK LID/OVERFLOW BIN.
-
Press down firmly on the printer lid and pull the lid upwards by the handle.
WARNING! The printer lid is heavy! Risk of crushing hands! Open the lid carefully.
IMPORTANT! Electrolock! You have 10 seconds to open the printer lid. Then the electrolock will activate and you will have to press the UNLOCK LID/OVERFLOW BIN button again.
-
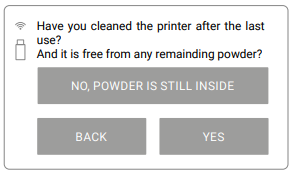
If the printer is clean press YES. If there is powder inside the print chamber press NO, POWDER IS STILL INSIDE. You will learn how to clean the print chamber here. If this is the first printing process, there will be no such message.
-
Upload a .scode file to the printer. You can send it from the Sinterit Studio Software via Wi-Fi network or by inserting flash drive into the USB port.
-
Select the file source and then file you want to print.
-
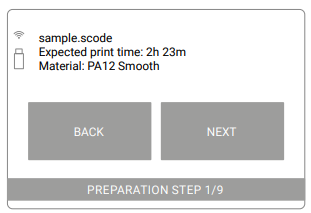
You should see basic information about the printing process: name of the file, printing time, name of the powder. Press NEXT.
-
Check that nothing will interfere with the recoater. Press NEXT.
-
You should see the levelling of the recoater, Print Bed and Feed Bed.
-
Fill the Feed Bed with powder. Add more powder than fits in the Feed Bed.
-
Compress powder with the trowel.
-
Press DONE.
-
Press START LEVELING to start levelling the powder. You can stop the process by pressing STOP LEVELING.
-
If you are satisfied with the powder surface press NEXT. If you want to repeat the process press REPEAT LEVELING.
-
Remove the split pin holding the heating module (1).
-
Lower the heating module (2).
-
Unscrew two release nuts and take out the laser protective glass (3).
-
Clean the laser protective glass with cotton cloth soaked with ethanol solution, and then wipe it dry (4).
-
Reinsert the laser protective glass (5) and screw quick release nuts (6).
-
Pull the heating module up (7) and secure it with split pin (8). Press DONE
IMPORTANT! Never clean the laser protective glass under running water or above the print chamber.
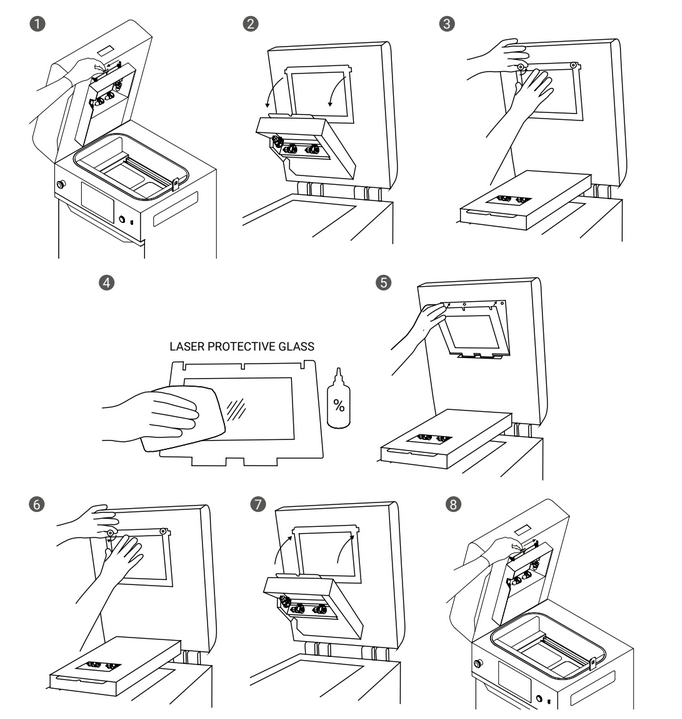
Cleaning the laser protective glass
-
Clean the pyrometer window module with cotton cloth soaked with ethanol solution, and then wipe it dry. Press DONE.
-
Clean the recoater guide bar. You can use cotton cloth or brush. Press DONE.
-
Lubricate the guide bar with silicone oil. Press DONE.
-
Make sure you have not left any tools inside the print chamber and close the printer lid.
-
Press START PRINTING.